Many thanks to the editors of Science for being repeat customers of my images!
And, for the photographers out there who want to know how I did this, the answer is sadly low-tech: I posted a keyword-rich album of mouse closeups many years ago on my Photoshelter website, and the art associates / designers of Science found me. They e-mailed me with an urgent request, and both times we had a contract and price agreed on within a few hours of their first e-mail.
In 2015 the city of Diamond Bar completed their Grand Avenue Beautification project, which included redesigning the medians and parkways of the Grand Avenue / Diamond Bar Boulevard and Grand Avenue / Longview Drive intersections. The landscape architecture work was done by David Volz Design.
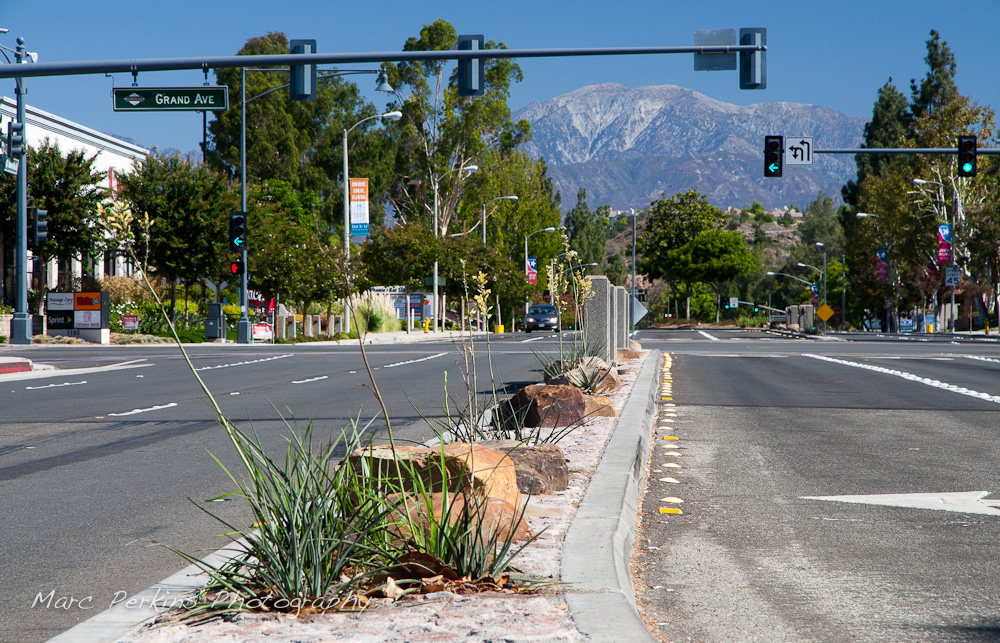
Happily enough, Diamond Bar Boulevard aims directly at Mt. Baldy, creating a view no photographer can resist*:
Mt. Baldy (Mount San Antonio) seen from the southern side of the Diamond Bar Boulevard and Grand Avenue intersection in Diamond Bar.
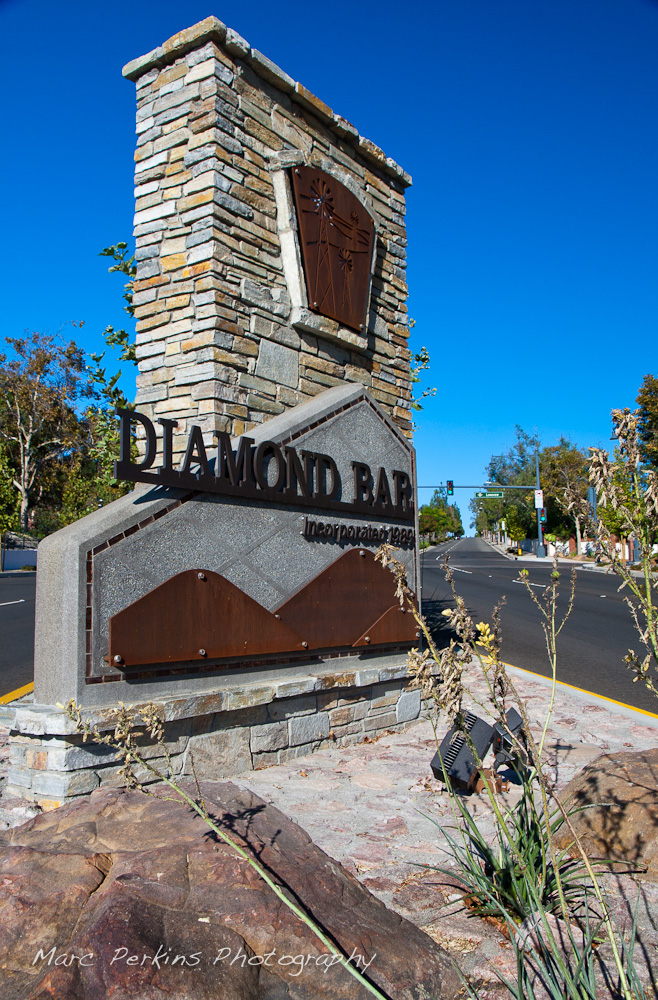
The Longview Drive intersection is at the eastern edge of the city, and features a new entrance sign for the city:
A full view of the sign at the eastern edge of Diamond Bar’s Grand Ave.
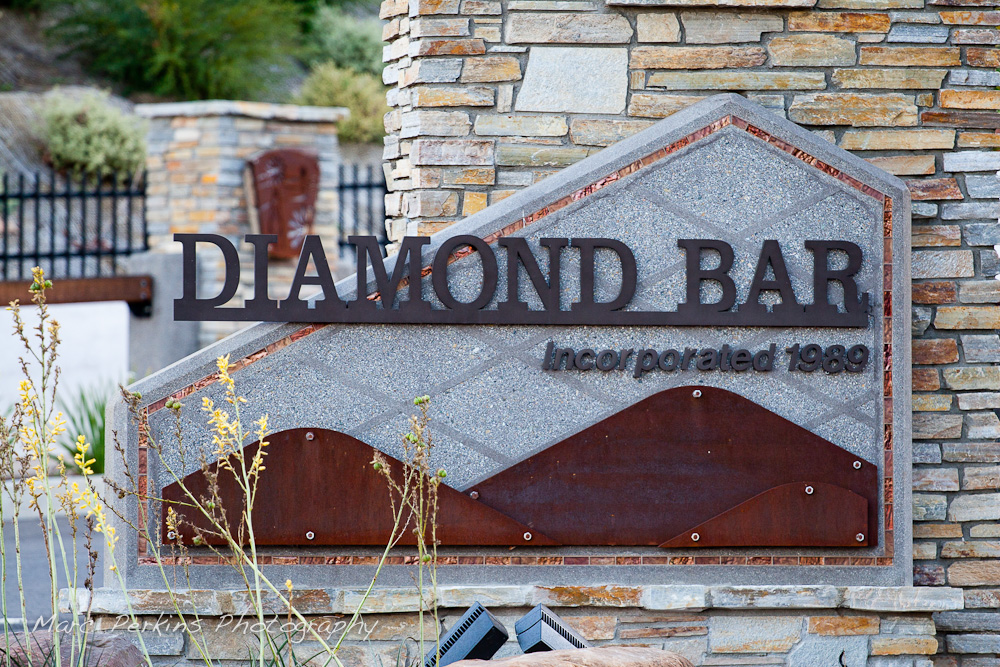
The sign is pretty just after sunrise, but the copper elements really stand out when it’s diffusely lit:
The entrance sign to Diamond Bar on the eastern edge of the city.
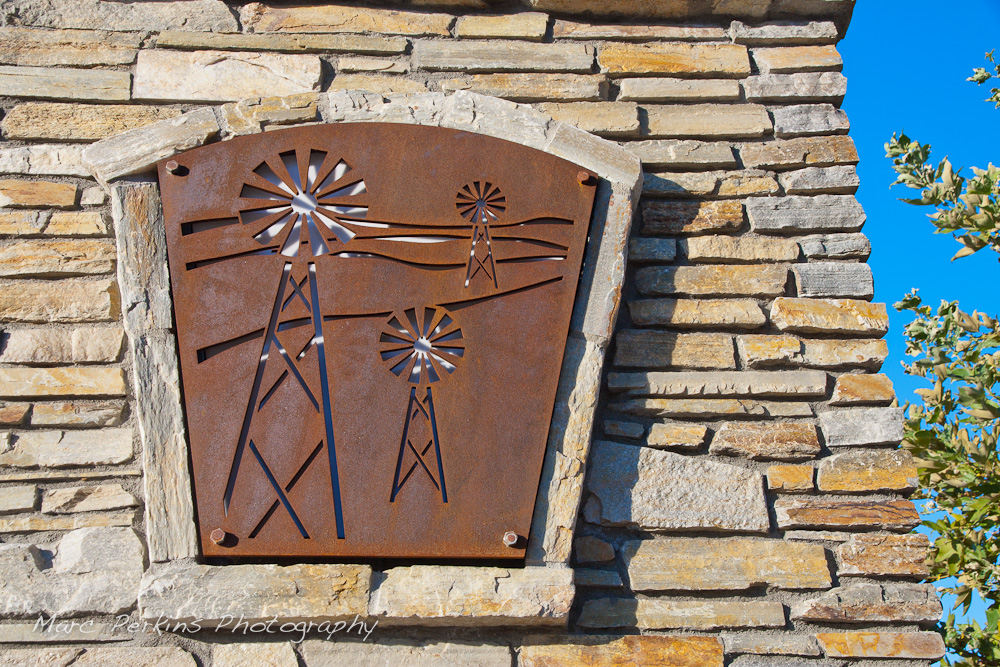
Iron plates form a repeating theme through the project, serving not just as elements on the entrance sign, but also as artistic inserts on parkway columns, display pieces in medians, and tree grates.
Metallic cutouts with a windmill pattern are frequent in the Grand Ave. corridor; this one is on the large entrance sign on the eastern edge of the city.
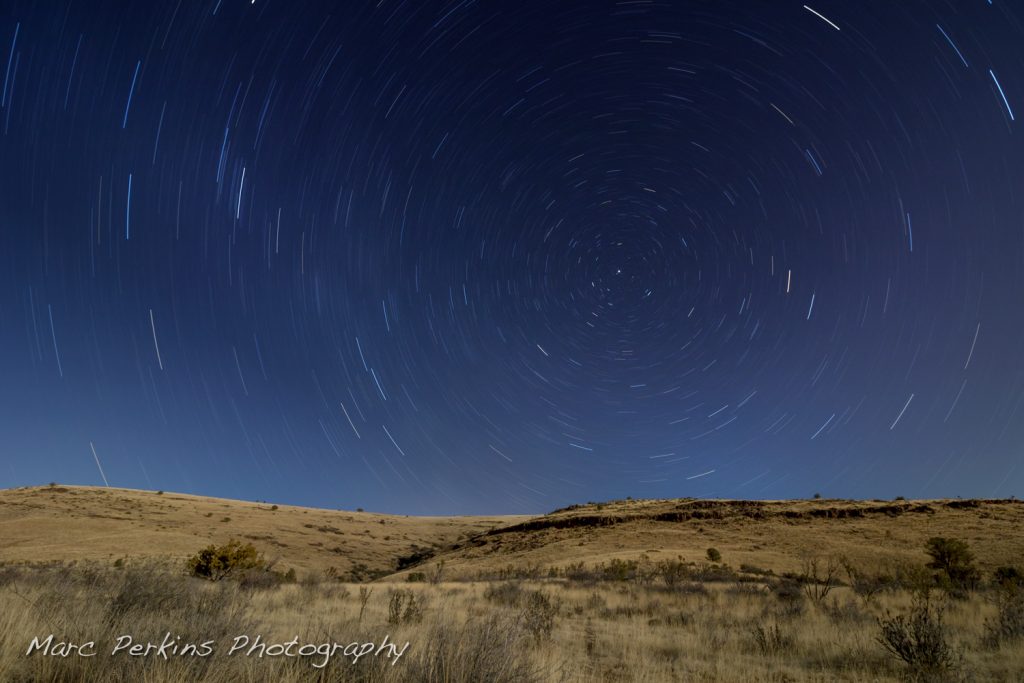
When I first started reading up on night photography years ago I remember looking at star trail images with wonder: simply by leaving the lens open for a long time one could capture the movement of the stars across the sky. Even more wondrous were images that included Polaris, the north star, which aligns with the planet’s rotational axis and thus does not move during the night (while all the other stars appear to spin around it). I promptly put capturing a long-exposure star-trail image with Polaris on my bucket list.
And last week while visiting Prescott, AZ, I finally got one I’m happy with:
A long-exposure image of the moonlit hills above Prescott Valley, Arizona.
This is a single-frame capture based on a roughly 30 minute exposure; the hills in the foreground are illuminated by moonlight.
Take a look in my Prescott, AZ gallery for a few more images from my recent trip there (though this is the only star trail image I’m sharing from the trip).
Lately I’ve started bicycling longer distances1, and as I’m riding, I’m seeing more of my local area. So many of the bicycle paths lead to stunning views, not to mention the gorgeous little parks.
But now that it’s winter I’m out riding a lot at night. Night changes so much about the landscape, especially in urban areas where a single bright point-source of light (the sun or moon) is replaced by multiple small light sources, many of which are different colors and intensities. Combine the change in illumination with a requirement for long exposure times and you have a recipe for a dramatic visual change.
I wanted to try to capture some of that changed beauty, so I recently biked to a couple of my favorite vantage points in Newport Beach to try my hand at it.
A moonlit view of Newport Beach’s Lower Newport Bay (and partially Upper Newport Bay) with PCH (Pacific Coast Highway) to the right and Newport Center's many tall buildings that surround Fashion Island to the left. Saddleback Mountain can be seen off in the distance, to the left.West Newport Beach as seen from Ensign View Park (in Newport Heights). Visible to the left is the Lido Peninsula and western tip of Lido Island with the Via Lido Bridge; Pacific Coast Highway (PCH) is visible in the foreground, as are many of the buildings on the Newport Peninsula's / Balboa Peninsula's western portions. 2
But those are just general overviews; the image I’m happiest with takes just a piece of one of those and lets your eye linger on the details:
A closer look at a portion of west Newport Beach's Newport Harbor as seen at night from Ensign View Park. Pacific Coast Highway (PCH) is in the foreground; behind that are buildings on Newport Peninsula / Balboa Peninsula that front Newport Harbor, most striking among them is the multi-story Blackman Ltd. building at 3388 Via Lido Drive, with the parking structure at the Lido Marina Village on the right. Behind those and the palm trees lie two open-ocean oil platforms (one above the Blackman building, and one above the parking structure).
All of these are single-frame exposures with minimal manipulation in post processing. A few more images can be found in my Newport Beach at Night album.
1 I’m trying to get in at least 80 miles a week, and am hoping to build up to riding a century in a few months. 2 The two tall buildings on the left are the Vista Del Lido complex and the 601 Lido Condominiums; the two tall buildings on the right (that almost appear as one) are Newport: The Towers (3121 PCH) and Newport Surgery Center (3333 PCH).
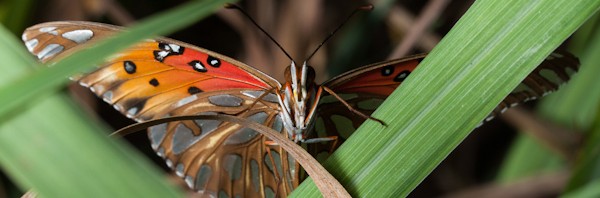
While out in the garden this weekend I spotted a gulf fritillary, Agraulis vanillae incarnata. They’re stunning butterflies:
A gulf fritillary hides among blades of lemongrass.
What first caught my eye was the silver reflections of the spots on the bottom of their wings. In direct sunlight it looks like they’re metallic; very eye-catching. But when the same butterfly is in diffuse light, those spots look white:
A gulf fritillary stands on a [Ficus] leaf.
Compare the first and second picture, and you’ll see that in addition to changing from metallic to white, the butterfly can also choose how much color to show on its underside. When it spreads its wings (as in the first picture), the bright red/orange coloration of its forewing is revealed; but when it rests with both wings pulled together and upright (as in the second picture) it can completely hide the red/orange color, thus showing only brown and white/silver. It can also partially separate the wings, to reveal just a bit of color (as it liked to do when it was annoyed with how close I was getting).
And speaking of color, check out the top of those wings:
A gulf fritillary stands amongst blades of lemongrass with its wings outstretched.
This butterfly only held open its wings for a few seconds after each flight attempt, so spotting the true colors of the wings takes finding one in flight and then watching it land.
For a fourth, and final, view of the gulf fritillary, how about a head-on look?
A gulf fritillary rests its foreleg on a blade of lemongrass.
Sleek and slim, complete with a coyly resting forelimb.
And in case you didn’t realize, all four of these images are of the exact same individual. It’s surprising how different it looks depending on angle and lighting.
The larvae reportedly only eat passion flower vines; I wonder which of my neighbors has one.
More pictures
To see more of my insect pictures, head to my Insects gallery.
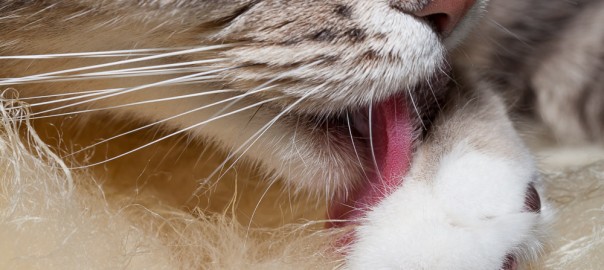
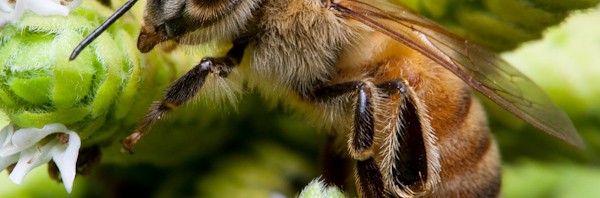
It’s been a busy summer without much time for photography, but today I grabbed the camera and headed for my garden. I was happy to capture this closeup:
Bee on marjoram. Macro.
That’s a bee (likely a honeybee, Apis mellifera) on a marjoram (Origanum majorana) inflorescence.
Look at those antennae (I love the ball joint at the base), those big eyes filled with ocelli, veined wings, and all those lovely little hairs. She’s a beauty!
Many thanks to my good friend Hannah, who gave me a set of wireless flash triggers that played a key role in capturing this image.
More pictures
To see more of my insect pictures, head to my Insects gallery.
I’ve been trying to do more of my errands by bicycling, and one of my biggest holdups has been a lack of cargo room: it’s hard to lug home 80 pounds of cat litter in a backpack. So, a few months ago I started shopping on Craigslist for a bike trailer, only to find out that a good friend had one in her garage that I could have for free.
My Schwinn Spirit bike trailer before modification.
That’s a Schwinn (Pacific Cycle) Spirit Bicycle Trailer, rated to hold up to two 50-lb kids (aka: 100 pounds of cargo!). I immediately fell in love with it, and even used it to lug home 80 pounds of cat litter from the pet store:
Two 42-pound bags of Fresh Step cat litter strapped in like kids into my bike trailer's child harness. So cute!
An unexpected bonus of the trailer is that whenever I have it attached to my bike, cars give me more maneuvering room. I bike on city streets in Orange County, CA, and am used to having only a few inches of space between my side mirror and the cars zipping past me. But when I’m using the trailer, most cars will actually change lanes before even attempting to pass me (or at least give me four or five feet of clearance), and I’ve had multiple people literally stop to let me go in front of them. Amazing.
But using the trailer for cargo has proved to be less than ideal, as the bottom of the trailer is just made of soft fabric: the kids’ weight is designed to be supported entirely by the harness (which is hung from a horizontal metal rod). So, unless I had cargo that was perfectly sized to fit into that harness (like the bags of cat litter), I was limited to low weight.
The bottom of the Schwinn Spirit bike trailer (with the child harness removed) is just thin fabric: not good for cargo.
So, I wanted to modify the trailer to add a solid base to convert it to a cargo trailer, and while I found lotsofDIY tutorials, they all involved removing the fabric. However, I wanted to keep the fabric on my trailer to protect my cargo from weather and prevent it from blowing around. Additionally, my guess is that the extra space I’m getting when I use the trailer is due to both the visual bulk of the trailer (it’s actually the same width as my handlebars, but makes my bike look much wider) and also because people think there are cute wittle children in the trailer and thus are panicked about the possibility of hitting them1.
So, what I ended up doing is removing the harness and adding a wooden shelf that fit inside the existing fabric, so my trailer now looks like this:
My finished cargo trailer!
Read on for full instructions on how I built this!
Michelle and I tend our backyard garden every summer, and one of our joys is seeing the first produce of the year slowly ripen on the plants. Just this week our first cherry tomatoes (Solanum lycopersicum) are finally ripening, and so yesterday I took a few pictures of the glorious first fruits:
Two ripe Sun Sugar cherry tomatoes still attached to the plant, photographed using natural light only.
The tomatoes were in some nice diffusely-lit shade, and that’s what you see above – I used a tripod to stabilize the camera, but otherwise didn’t need anything else.
But since I’ve been having fun experimenting with off camera lighting recently, I decided to pull out my lighting gear and try some “studio” style lighting on the fruits.
The same two ripe Sun Sugar cherry tomatoes, photographed using “studio” lighting.
Those are the exact same fruits in the exact same position, but now they’ve been lit using the “invisible black background” technique I’ve described before1.
What a difference lighting makes! The black background makes the fruits pop out visually, thanks to less visual clutter, but I think it also makes the scene look more artificial (or as though it was taken at night). My favorite comment so far comes from my dad, who said that the fruit look like two “hot Jupiters”. Little tomato planets floating in space; I like it.
Footnotes
1 Two snooted flashes were setup, one on either side of the fruit, and I used my gray card to shade the background from the primary flash’s illumination. Both flashes also had great natural gobos: the branches of the plant itself.
–
As I’ve postedbefore, Michelle loves to make chainmail. So, it wasn’t a surprise when she recently asked me to take a picture of her latest project1:
A european 8-in-1 copper chainmail bracelet with a sliding clasp.
For the purposes of this post, note the background: it’s seamlessly black, with nothing at all visible. And that background was created with no work at all in Photoshop (other than removing a string I used to support the project) – it was created solely by careful placement of off-camera lights. As the method is pretty neat, I thought I’d show you how I did it.
The first technique most people think of for getting a black background is to, well, put something black behind the object. While this works, it requires careful lighting and spacing to ensure that the black object doesn’t become visible (as more than just solid black) in the image. I did just this outdoors with my amaryllis flower bud images, but I had to find flower buds with enough shaded space behind them to hang a black T-shirt on a spare chair well behind the depth of field of the image, and then whenever stray light hit the T-shirt you could see the folds in the fabric. Annoying.
For the maille bracelet I created a black background by putting absolutely nothing behind the maille. And I mean literally nothing: here’s what the maille looked like as I was setting it up:
The bracelet seen in natural room lighting in my "studio"; the metal rod on the right is the stand the bracelet is hanging from.


![A gulf fritillary [Agraulis vanillae incarnata] hides amongst blades of lemongrass [Cymbopogon sp.]. It looks like it's hyper aware; stalking prey (even though it's looking for nectar …). The bottom of this species' wings have beautiful spots that reflect silver in bright light (as you can see in this image), but are white in the shade. The forewings are also partially red. (Marc Perkins)](http://www.photoshelter.com/img-get/I000043.P.1oWPes/s/700/466/20140719-garden-insects-MG-1837.jpg "Fritillary hiding in the (lemon) grass")
![A gulf fritillary [Agraulis vanillae incarnata] stands on a [Ficus] leaf. The spots on its wings when closed are white in the shade (as in this image), but reflect light to appear a beautiful silver when illuminated. When its wings are closed, the bright orange and red colors of the butterfly are completely hidden. (Marc Perkins)](http://www.photoshelter.com/img-get/I0000uYOrspHYlKI/s/700/466/20140719-garden-insects-MG-1955.jpg "Fritillary on ficus")
![A gulf fritillary [Agraulis vanillae incarnata] stands amongst blades of lemongrass [Cymbopogon sp.] with its wings outstretched, showing off its bright orange colors. The bottom of its wings have silver spots on them, not visible in this picture. (Marc Perkins)](http://www.photoshelter.com/img-get/I0000VsZS_37vkH0/s/700/428/20140719-garden-insects-MG-1892.jpg "Fritillary in color")
![A gulf fritillary [Agraulis vanillae incarnata] rests its foreleg on a blade of lemongrass [Cymbopogon sp.]. (Marc Perkins)](http://www.photoshelter.com/img-get/I00007WhnRphnaN0/s/700/466/20140719-garden-insects-MG-1849.jpg "Fritillary up close")
![A bee (likely a honeybee; [Apis mellifera]) climbs a marjoram ([Origanum majorana]) inflorescence. The bee's eye, antennae, wings, legs, and fine body hairs are all in focus, as are the pistils and stamen of some of the marjoram flowers. (Marc Perkins)](http://www.photoshelter.com/img-get/I0000tsIDEF._QAQ/s/700/680/20140719-garden-insects-MG-1794.jpg "Bee on marjoram")


