While out in the garden this weekend I spotted a gulf fritillary, Agraulis vanillae incarnata. They’re stunning butterflies:
A gulf fritillary hides among blades of lemongrass.
What first caught my eye was the silver reflections of the spots on the bottom of their wings. In direct sunlight it looks like they’re metallic; very eye-catching. But when the same butterfly is in diffuse light, those spots look white:
A gulf fritillary stands on a [Ficus] leaf.
Compare the first and second picture, and you’ll see that in addition to changing from metallic to white, the butterfly can also choose how much color to show on its underside. When it spreads its wings (as in the first picture), the bright red/orange coloration of its forewing is revealed; but when it rests with both wings pulled together and upright (as in the second picture) it can completely hide the red/orange color, thus showing only brown and white/silver. It can also partially separate the wings, to reveal just a bit of color (as it liked to do when it was annoyed with how close I was getting).
And speaking of color, check out the top of those wings:
A gulf fritillary stands amongst blades of lemongrass with its wings outstretched.
This butterfly only held open its wings for a few seconds after each flight attempt, so spotting the true colors of the wings takes finding one in flight and then watching it land.
For a fourth, and final, view of the gulf fritillary, how about a head-on look?
A gulf fritillary rests its foreleg on a blade of lemongrass.
Sleek and slim, complete with a coyly resting forelimb.
And in case you didn’t realize, all four of these images are of the exact same individual. It’s surprising how different it looks depending on angle and lighting.
The larvae reportedly only eat passion flower vines; I wonder which of my neighbors has one.
More pictures
To see more of my insect pictures, head to my Insects gallery.
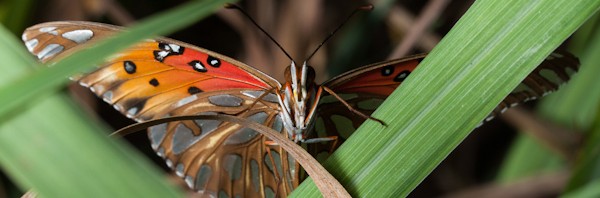
It’s been a busy summer without much time for photography, but today I grabbed the camera and headed for my garden. I was happy to capture this closeup:
Bee on marjoram. Macro.
That’s a bee (likely a honeybee, Apis mellifera) on a marjoram (Origanum majorana) inflorescence.
Look at those antennae (I love the ball joint at the base), those big eyes filled with ocelli, veined wings, and all those lovely little hairs. She’s a beauty!
Many thanks to my good friend Hannah, who gave me a set of wireless flash triggers that played a key role in capturing this image.
More pictures
To see more of my insect pictures, head to my Insects gallery.
Michelle and I tend our backyard garden every summer, and one of our joys is seeing the first produce of the year slowly ripen on the plants. Just this week our first cherry tomatoes (Solanum lycopersicum) are finally ripening, and so yesterday I took a few pictures of the glorious first fruits:
Two ripe Sun Sugar cherry tomatoes still attached to the plant, photographed using natural light only.
The tomatoes were in some nice diffusely-lit shade, and that’s what you see above – I used a tripod to stabilize the camera, but otherwise didn’t need anything else.
But since I’ve been having fun experimenting with off camera lighting recently, I decided to pull out my lighting gear and try some “studio” style lighting on the fruits.
The same two ripe Sun Sugar cherry tomatoes, photographed using “studio” lighting.
Those are the exact same fruits in the exact same position, but now they’ve been lit using the “invisible black background” technique I’ve described before1.
What a difference lighting makes! The black background makes the fruits pop out visually, thanks to less visual clutter, but I think it also makes the scene look more artificial (or as though it was taken at night). My favorite comment so far comes from my dad, who said that the fruit look like two “hot Jupiters”. Little tomato planets floating in space; I like it.
Footnotes
1 Two snooted flashes were setup, one on either side of the fruit, and I used my gray card to shade the background from the primary flash’s illumination. Both flashes also had great natural gobos: the branches of the plant itself.
–
Planarians are free-living aquatic flatworms that are staples of high school biology labs. The species I was able to photograph, Dugesia tigrina, is fairly small, growing up to about an inch in length when stretched out.
A live brown speckled planarian {Dugesia tigrina} swimming in a dish full of water above a white background. The light is coming from the left, and the worm’s shadow is subtly visible. The pharynx (a tube the flatworm extends from its body for feeding) may be visible as a darkened tube in the middle of its body.
Planarians are utterly adorable. Their heads have cute little eyespots (ocelli) that sense light and auricles (the triangular extensions) that reportedly sense water currents. The eyespots lack lenses and a retina, so these cute little worms aren’t looking up at you and seeing your face, but they can detect the intensity and direction of light, allowing them to swim away from light (which is one of the easiest behaviors to observe in them; shine a light on them, and they’ll swim directly away from it). And when they move, they glide through the water with serpentine elegance.
A brown speckled planarian {Dugesia tigrina} swimming diagonally in a dish of water on a white background. The planarian’s eye spots (ocelli) and auricles are plainly visible in this closeup on its head.
The dark portions of the eye are not actually the photosensory nerves. Instead, the dark portions are pigment-filled cells that partially surround the photosensory neurons, shading them from one side (thus allowing them to detect the direction of light without a lens, retina, or movable eye).
While many flatworms are parasitic, these planarians are not; they’re free-living omnivores that swim around in freshwater ponds nomming on whatever they can find predators feeding on small insects and other invertebrates they’re able to capture (see comment thread for citations). In the lab we frequently feed them small pieces of liver or thymus.
A live brown speckled planarian {Dugesia tigrina} feeding on a small piece of thymus. The planarian’s pharynx, a feeding tube that extends from its gastrovascular cavity (digestive tract), is easily visible connecting the mid-section of the worm to the food.
The way flatworms feed is just awesome. Instead of having a mouth at their head, they extend a tube (their pharynx) from the middle of their body and latch this tube onto their food. They then “suck” the food up through this tube and into their digestive tract.
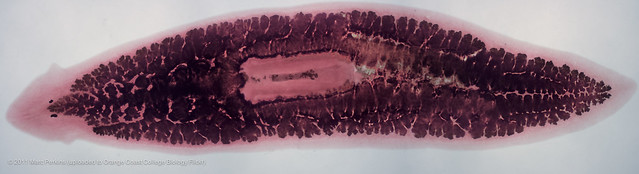
Speaking of guts, flatworms’ digestive tracts aren’t built like ours are: they have just a single opening that leads to and from their digestive track. This contrasts with our style of digestive tract, which has two openings: a mouth and an anus. The planarian style of digestive tract is called a gastrovascular cavity, and it can be seen in the following image of a preserved planarian slide:
A whole preserved planarian seen through a compound microscope after the gut has been filled with ink. The head is visible at the left, most notably the ocelli (eye spots) and auricles (triangular outgrowths from the head). In the center of the body is the pharynx, a long tubular structure that is extended from the body to feed. The pharynx connects to the gastrovascular cavity at the left end of the tube. The gastrovascular cavity extends throughout their body; in this individual it has been filled with black ink.
And yes, this does mean that digested food has only one way out: through the same opening that they used to get the food in.
Planarians are used in biology labs primarily thanks to their easy availability from biological supply houses ability to regrow tissues from traumatic injuries: when cut in half they can regrow the other half of their bodies. This is because while they can reproduce sexually using sperm and eggs, they can also reproduce asexually via fragmentation. Fragmentation is a reproduction mechanism wherein an organism literally pulls itself in half, with both halves growing into complete new organisms. This leads to the classic high school biology “experiment” wherein students cut flatworms in half and wait for them to regrow. We won’t be doing that here. But this picture of two flatworms swimming next to each other almost looks like it 🙂
The head of one brown speckled planarian {Dugesia tigrina} swimming up positioned next to the tail of a second planarian swimming down in a dish of water on a white background.
I get live planarians each semester to show my biology classes, but sadly most students just give them a passing glance. Next time you get a chance to observe these cuties, put them in a dish of water, get a dissecting microscope and some liver, and plan to spend some time with them. They’re great fun!
A brown speckled planarian {Dugesia tigrina} turning in a circle on a white background. The planarian’s eye spots (ocelli) and auricles are plainly visible on its head.
Amaryllis (Hippeastrum sp. cultivars) are grown in most cold regions of the United States as an indoor houseplant that people work hard to force to flower. One of the nice things about living in coastal Orange County is that plants like amaryllis can live year-round outdoors in the soil, and need no forcing to flower.
We put in a few small plants 7 or 8 years ago, and they’re now giant bulbs that send up multiple flower stalks every spring. I’ve been watching this year’s flowering stalks grow daily, and finally made some time last week to go out and get some pictures.
Teamwork: Three developing amaryllis inflorescences.
Amaryllis flowers grow in inflorescences, clusters of multiple flowers growing from a single leafless stalk called a scape (three scapes with their developing inflorescences are visible in the picture above). The actual flowers develop at the tips of the scapes surrounded by two modified leaves (bracts) called spathes.
In the image above you can see the two spathes starting to split apart on the front-most inflorescence, revealing one of the red amaryllis flowers inside. As the spathes open further, the multiple flowers contained inside start to elongate their pedicels (the stalks that attach each flower to the scape) and they emerge from the spathes:
Opening Day: Three amaryllis flower buds emerge from their sheath
Amaryllis are showy, long-lasting flowers, but I think the buds are under-appreciated.
Technically these shots were fun to capture. I wanted to create a studio-esque feel, so the viewer could focus on the details of the buds themselves without distraction from the background. I worked on a partly cloudy day, and set up a black backdrop behind the subjects I wanted to photograph, using a reflector to add highlights or fill as needed. The second image is a blend of five images to get additional depth of field (using the technique described in my poinsettia behind the scenes post), but the first is a single-frame capture. All plants were left completely intact, and if all goes well they’ll be in full flower soon.
Here are two more images of amaryllis. The first is another image from the day’s work (a single inflorescence up close) and the second is a closeup of one of my amaryllis flowers from last year.
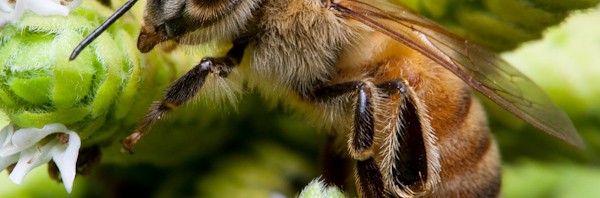
As I was taking my oat grass guttation pictures, I kept an eye out for cute critters on my newly planted grass. And, of course, there were some:
Home on the range: A small family of green aphids on an oat grass {Avena sativa} leaf. The scale bar (lower-right) is 1mm long.
That’s a young family of aphids, just starting out in life. Aphids are phloem-feeding plant parasites, so they’re sittin’ there having lunch. They have a proboscis they insert into the leaf’s phloem vessels, which they then drink like a soda through a straw. Phloem is just about as nutritious as soda, so aphids have serious problems getting enough nutrition and dealing with the sugar overload, but that’s the topic for another post (and probably another blog …).
The larger aphid is almost certainly a parthenogentically reproducing female. She reproduces asexually, creating more daughter offspring from just her own unfertilized eggs. Yes, kids, that does mean that she can have baby aphids without any daddy aphids around.
So, the six smaller aphids (called nymphs until they mature) are almost certainly her offspring. The mother will keep producing more and more offspring asexually, and these offspring themselves will almost certainly be able to parthenogentically reproduce as well1. That grass stalk won’t be happy for long.
It can often be hard to tell from web-sized images how much detail is contained in the original capture. Since I know you’re thinking that these aphids are adorably cute, here’s a crop of the image above focusing on them (see the same crop as a larger image here):
Crop of my "Home on the Range" image; the scale bar is still 1mm long.
I’m not certain what species these aphids are, but I suspect they may be Diuraphis noxia, the Russian Wheat Aphid.
Oh, and the small drop of water at the tip of the grass stalk is there because the grass is guttating – exuding water from its tip due to root pressure. I write about that more in this post.
1 Winged and/or sexually reproducing individuals can also be born, typically when environmental conditions change dramatically (e.g., the onset of winter, or depletion of the food source).
My cats love to nibble on grass, and so I grow tack oats (Avena sativa) from seed for them. About six months ago I figured out that on cool, humid mornings the grass could be seen guttating. At the time I lacked my macro lens, and so did the best I could and got this image. It’s an okay image, but I don’t like the choice of background in retrospect, and I also wanted to get in closer and show just a few stalks of grass so the water drops would be more obvious.
Over the weekend some newly planted grass was again demonstrating guttation, so I tried anew:
Three stalks of oat grass demonstrating guttation.
Guttation is caused by root pressure building up so that water is squeezed out pores (hydathodes) at the tips or sides of a plant’s leaves. It typically happens at night, under cool, moist conditions when the soil is well hydrated. As Wikipedia says, it’s important to note that guttation and dew are two completely separate phenomena.
To demonstrate guttation in a typical botany science lab , a technician sets up a few-weeks-old pot of grass under a bell jar, waters it thoroughly, and leaves it for the night. The next morning tiny drops of water cover the plant’s leaves. One thing I like about my example is that it’s free of lab manipulation: this pot of grass was just sitting on my porch when I saw the guttation and brought it in to photograph.
Two guttating oat grass stalks with a strand of spider silk leading off camera. Scale bar (lower-left) is 1mm long.
If you’re curious how I photographed these, I used a technique much like1 that used with my poinsettia flower closeups; see my behind the scenes post for more details.
1 The first image is a single-frame capture; the second is a multi-image blend to increase depth of field. Both use a studio setup almost identical to the poinsettia setup, except I used reflected direct sunlight to aid in illumination.
New feature alert: I’ve always enjoyed reading other photographers’ “behind the scenes” and tutorial posts, so from now on I’ll occasionally post them. This post focuses on the “studio” and exposure blending techniques I used to create a macro image of a poinsettia flower.
Introduction
Last month I wrapped up a three-post series on poinsettias (post 1, post 2, and post 3). The images for the first two of these posts were taken back in December in an Orange Coast College Ornamental Horticulture greenhouse, which was a great location to work in as it had slightly directed diffuse light (sun shining through semi-opaque panels at the top of the house) and hundreds of plants to hunt through for specimens. Unfortunately, though, poinsettias have separate male and female flowers, and only the male flowers were visible during that shoot.
Thus I had to keep a plant at home and wait. About a month later the female flowers had emerged, and I was able to get some images and finish the series. The highlight of the series (for me) is this closeup on an inflorescence that demonstrates all of a poinsettia flower’s anatomy in a single image.
The image:
A single female poinsettia flower with stigma, style, and enlarged ovary can be seen emerging from its involucre (cluster of bracts fused together) on a thick pedicel (stalk). Also emerging from the involucre are a number of withered male flowers (stamen and anthers both visible) that still have yellow pollen on them. The involucre has a nectar gland emerging from it (that looks like two yellow lips). The entire inflorescence (involcure, male flowers, and female flower) is growing up from a stem's branching point, where a large red bract is also emerging. The red leaves surrounding the inflorescence (mostly out of focus) are also bracts. The scale bar (at bottom center) is 5mm long.
Lighting, equipment, and setup
Getting the shot was not trivial. First, I didn’t have access to the greenhouse, but needed to get similar lighting to maintain consistency between the images in the series. I found good lighting in a room of my house that faces east, and has white curtains and bright walls. In the early morning the sun hits the curtains and diffuses through the room nicely (while maintaing some directionality to the light).
I used my Canon 60mm ef-s macro lens in manual-focus mode, and determined the base exposure and set a custom white balance in-camera using a gray card (see this post by Greg Basco for why setting a custom in-camera white balance is useful). Said gray card was photographed out of focus, so it also served as a test for dust spots (which can be deadly during exposure blending for depth of field).
I’m tired of taking macro photographs with my camera hanging down from the tripod, so I supported the plant on a chair a few feet from the window, with my camera in between the window and plant. This allowed me to move either the plant, tripod, or tripod head to adjust framing.
Framing closeups of plants is tedious, as leaves and other structures often get in the way and cover up important anatomy. I put some leaves underneath the lens to corral them, but a few others kept popping up annoyingly. My solution was to weigh them down with my lens cap. High tech, I know.
The background was another issue. It was clearly going to be out of focus, but I needed the color to not be glaring. For the first two shoots in the greenhouse I simply grabbed an additional poinsettia or two and put them behind the first plant. Voila! Instant matching background.
For this shoot my first background was a white closet door. The white became a bit jarring for the composition above, though, as there were just a few white spots shining through the red bracts. So, I grabbed a black shirt and hung it on a chair behind the plant. The background disappears, and you probably didn’t even know there was a black background behind the bracts (which is exactly what I wanted).
Here’s a picture of the setup:
The setup for my poinsettia flower closeup image. My Canon 30D is sitting on my tripod with a cable release and my 60mm EFS lens pointing at a poinsettia that has a mature female flower emerging from the involucre. Behind the potted plant is a chair with a black T-shirt hanging on it to act as a background.
Settings and image capture
Next came the old debate of settings. I wanted sharpness and depth of field, and didn’t care a whit about exposure time thanks to being indoors and able to turn off the wind (read: turn off the heater). I’ve found that the lens is sharpest around f5.6 – f8, but at the focal distance I wanted to use my depth of field at that aperture is miniscule. For the first images of the day I was able to get everything I wanted in focus composed in a single plane, and thus I pushed the aperture to f11 and f13 for a bit more depth of field in a single image with acceptable sharpness.
But for the image above I needed more depth of field, thanks to that giant ovary and large cluster of male flowers. Thus, I fell back on my old standby: image blending for depth of field. Greg Russell has a great tutorial on image blending which summarizes the technique beautifully.
The technique I used boils down to this: I started by setting the focus and exposure to manual and focusing on the closest subject I wanted sharp (the pollen grains on the front of the ovary). I then took a series of images at f8, adjusting the focus backwards by as small a margin as I possibly could as I focused through the range I wanted sharp. Using a macro-rail tripod head to change the camera’s position as I changed focus would have been ideal (since the field of view of the lens changes as it focuses), but as I lack a rail slider I couldn’t do that.
As a side note, assuming that you don’t have a rail slider, always compose your exposure-blended images at the closest focus you plan to use. That’s the focus with the narrowest field of view, and thus the one that will most likely limit your cropping post-exposure-blend.
Processing
I then imported all the RAW images into Lightroom 3.6 and did my typical adjustments (white balance, exposure, black point, brightness, contrast, saturation, noise reduction, spot removal, etc.). I shot a series of 11 sequential focal planes on this particular composition, but ended up choosing only the first eight to use for the final product, as the last three put distracting elements of the flower into sharp focus. I know some people who exposure blend try to get everything in focus (creating infinite depth of field), but I often find this to be distracting; having the background and foreground out of focus provides depth to the image (and also isolates the subject).
Here are the eight processed images that form the base of the final image:
Eight separate images of the same female poinsettia flower, each focused on a slightly different plane. The closest-focused image is in the upper-left; the furthest-focused image is the lower-right.
Exposure blending
I used Lightroom’s “Edit in Photoshop as layers” feature to get the adjusted images into Photoshop CS5, aligned the layers using Photoshop’s built in tool (Edit / Auto-Align layers), and then blended the layers for depth of field (also using Photoshop’s built in tool: Edit / Auto-Blend layers).
Exposure blending rarely works perfectly on the first try, though, so I looked through the blended image at 100% to check for errors. Sure enough, there were a bunch: a few “points of light” where photoshop puts a bright spot into the image near the edge, and also a few areas where Photoshop chose the wrong layer to use (thus adding an out-of-focus area into an area that should have been in-focus). Here’s what two of them looked like:
Close-in views of two blending errors Photoshop CS5 made while blending my eight-image Poinsettia female flower image.
On the left Photoshop has selected a line of the plant stem at the correct focus, but then used incorrect focal planes for the remainder of the stem (both above and below the in-focus portions). A single image has everything from the in-focus portion up perfectly in focus; Photoshop has just chosen … poorly. On the right Photoshop has added what I call “points” or “bars” of light, blending errors (often near the edge of an image) where Photoshop inexplicably adds in a bright streak or point.
To fix these I un-did the blending, found the incorrect layers Photoshop had used, and erased the parts of those images Photoshop had selected. Then I re-blended the image, checked again, and continued this until I got an image I was satisfied with.
Scale bar
To add the scale bar I captured a separate image with a ruler in the frame next to the flower (after I had finished shooting, since putting the ruler in the frame could easily damage the flower), then copied that image as a layer onto the final blended image and made sure the flower was precisely the same size in the ruler image as in the blended one. A quick use of the line tool got me a subtle scale bar that I could move wherever I wanted in the blended image. I chose to put it in the shadows near the bottom, so it’s visible, but you have to look to find it.
Final notes
And that’s it; head back to the top of the post to see the final product!
Using this layer blending technique is a bit cumbersome, but it allows me to maintain optimum image sharpness while precisely controlling the depth of field (by choosing how many focal planes to blend together into the final image). It’s worth doing, but only for those images that really need it.
Thanks for reading! I’d love any suggestions, and would be happy to answer any questions.
In my previous two posts on poinsettia (Euphorbia pulcherrima) flowers I showed that the flowers are much smaller than most folks think (the large red structures are bracts, not petals) and was able to get some closeups of the inflorescences illustrating their anatomy.
In case you’ve forgotten, the inflorescences of poinsettias are not your typical boring flower: multiple male flowers and a single female flower are surrounded by a sphere of fused bracts called an involucre, out of which the flowers emerge. The involucres often have nectar glands on them, which look like two green or yellow lips.
A closeup of a poinsettia flower cluster from the side. The involucre are the large green structures tipped with red, with male flowers emerging from them.
Frustratingly, when I took that first set of pictures I couldn’t find any female flowers on the plants I had. I’ve since learned that this is because the female flowers only develop and extend out of the involucre after the male flowers have matured and produced their pollen (reducing the likelihood of self pollination). So, I waited, and yesterday finally got a chance to photograph the female flowers up close.
Here’s what a female flower looks like coming out of the involucre:
A single female poinsettia flower with stigma, style, and ovary can be seen emerging from its involucre. The scale bar is 5mm long.
There you can see the divided stigma (where pollen need to be deposited if they are to fertilize the flower’s eggs), the swollen ovary just barely protruding from the involucre, and the style connecting those two.
For more context, we can see that the maturing female flower is next to cyanthia filled with withered male flowers:
A single female poinsettia flower with stigma, style, and ovary can be seen emerging from its involucre on the right half of this image; on the left a number of withered male flowers and their nectar glands can be seen emerging from shriveled involucres.
Those withered male flowers were actually quite delicate, and likely only remained on the plant because it was kept indoors and shielded from most disturbances. I delicately put a ruler into the scene to get a scale bar after the shoot, and in doing so knocked off most of the male flowers.
In the image above the female flower is just poking out a little bit. Looking around on the plant I found one that had extended far out of the involucre, supported by a large stalk (pedicel) that was longer than the stigma and style put together:
A single female poinsettia flower emerging from its involucre (along with some withered male flowers) on a thick pedicel. The scale bar (at the bottom) is 5mm long.
And that, my kind readers, is what poinsettia flowers look like in a single image: one female flower and multiple male flowers emerging from an involucre that has a nectar gland on it and is surrounded by bright red bracts.
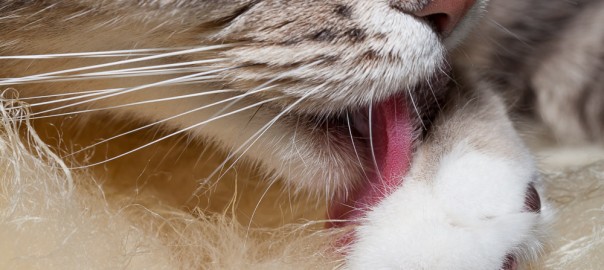
![A gulf fritillary [Agraulis vanillae incarnata] hides amongst blades of lemongrass [Cymbopogon sp.]. It looks like it's hyper aware; stalking prey (even though it's looking for nectar …). The bottom of this species' wings have beautiful spots that reflect silver in bright light (as you can see in this image), but are white in the shade. The forewings are also partially red. (Marc Perkins)](http://www.photoshelter.com/img-get/I000043.P.1oWPes/s/700/466/20140719-garden-insects-MG-1837.jpg "Fritillary hiding in the (lemon) grass")
![A gulf fritillary [Agraulis vanillae incarnata] stands on a [Ficus] leaf. The spots on its wings when closed are white in the shade (as in this image), but reflect light to appear a beautiful silver when illuminated. When its wings are closed, the bright orange and red colors of the butterfly are completely hidden. (Marc Perkins)](http://www.photoshelter.com/img-get/I0000uYOrspHYlKI/s/700/466/20140719-garden-insects-MG-1955.jpg "Fritillary on ficus")
![A gulf fritillary [Agraulis vanillae incarnata] stands amongst blades of lemongrass [Cymbopogon sp.] with its wings outstretched, showing off its bright orange colors. The bottom of its wings have silver spots on them, not visible in this picture. (Marc Perkins)](http://www.photoshelter.com/img-get/I0000VsZS_37vkH0/s/700/428/20140719-garden-insects-MG-1892.jpg "Fritillary in color")
![A gulf fritillary [Agraulis vanillae incarnata] rests its foreleg on a blade of lemongrass [Cymbopogon sp.]. (Marc Perkins)](http://www.photoshelter.com/img-get/I00007WhnRphnaN0/s/700/466/20140719-garden-insects-MG-1849.jpg "Fritillary up close")
![A bee (likely a honeybee; [Apis mellifera]) climbs a marjoram ([Origanum majorana]) inflorescence. The bee's eye, antennae, wings, legs, and fine body hairs are all in focus, as are the pistils and stamen of some of the marjoram flowers. (Marc Perkins)](http://www.photoshelter.com/img-get/I0000tsIDEF._QAQ/s/700/680/20140719-garden-insects-MG-1794.jpg "Bee on marjoram")


![Three young developing amaryllis ([Hippeastrum] sp cultivar) inflorescences can be seen growing on their scapes, long leafless stems that support them. Amaryllis inflorescences contain multiple flowers that develop inside spathes, bracts (modified leaves) that surround the young flowers. The two spathes are just starting to split open on the closest flower, revealing a bit of red from one of the flowers. The two flower stalks in the background are blurred out of focus. This image was captured outside using natural light; no flowers were harmed in the production of this image. (Marc C. Perkins)](http://www.photoshelter.com/img-get/I0000OeKQE41y7zw/s/475/744/20120315-amaryllis-flower-buds-macro-IMG-3699.jpg "Teamwork: Three amaryllis flower stalks growing")
![An amaryllis ([Hippeastrum] sp. cultivar) inflorescence pictured just as its flower buds are emerging from their sheath. There are three red and green flowers easily visible. These flowers are growing from a scape, a leafless stem that is used to support flowers. The three emerging buds are surrounded by two spathes, bracts (modified leaves) that surround the flowers as they develop (and then stay present as the flowers bloom). This image was taken outdoors using natural lighting on an intact plant growing in my yard; no flowers were destroyed in the making of this image :) (Marc C. Perkins)](http://www.photoshelter.com/img-get/I0000ot6rL3xIlcc/s/475/727/20120315-3743-3749-B-4-3-blend.jpg "Opening Day: Three Amaryllis flower buds emerging from their sheath")
![A young developing amaryllis ([Hippeastrum] sp cultivar) flower just starting to emerge from its sheath. Amaryllis flowers grow on a scape, a long leafless stem, and develop inside spathes, bracts (modified leaves) that surround an inflorescence (cluster of multiple flowers). The two spathes are just starting to split open, revealing a bit of red from one of the flowers. This image was captured outside using natural light, with a reflector used to angle light on to highlight the texture of the flower bud's tip. No flowers were harmed in the production of this image. (Marc C. Perkins)](http://www.photoshelter.com/img-get/I00002STtllhM17k/s/175/292/20120315-amaryllis-flower-buds-macro-IMG-3675.jpg "Hidden within: Amaryllis flowers peeking out")


