Many thanks to the editors of Science for being repeat customers of my images!
And, for the photographers out there who want to know how I did this, the answer is sadly low-tech: I posted a keyword-rich album of mouse closeups many years ago on my Photoshelter website, and the art associates / designers of Science found me. They e-mailed me with an urgent request, and both times we had a contract and price agreed on within a few hours of their first e-mail.
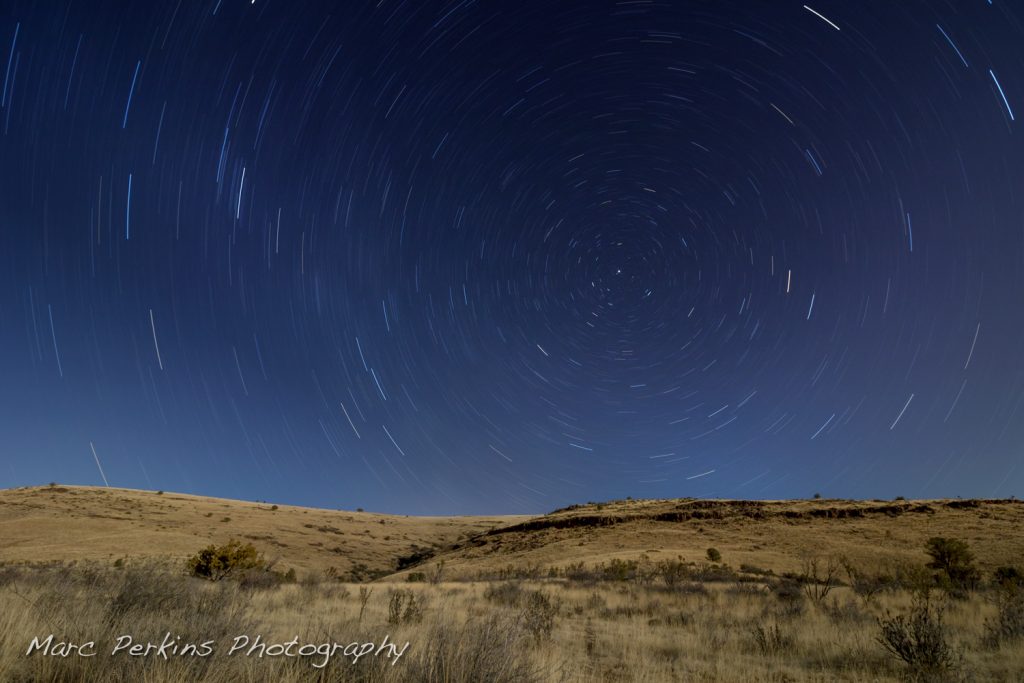
When I first started reading up on night photography years ago I remember looking at star trail images with wonder: simply by leaving the lens open for a long time one could capture the movement of the stars across the sky. Even more wondrous were images that included Polaris, the north star, which aligns with the planet’s rotational axis and thus does not move during the night (while all the other stars appear to spin around it). I promptly put capturing a long-exposure star-trail image with Polaris on my bucket list.
And last week while visiting Prescott, AZ, I finally got one I’m happy with:
A long-exposure image of the moonlit hills above Prescott Valley, Arizona.
This is a single-frame capture based on a roughly 30 minute exposure; the hills in the foreground are illuminated by moonlight.
Take a look in my Prescott, AZ gallery for a few more images from my recent trip there (though this is the only star trail image I’m sharing from the trip).
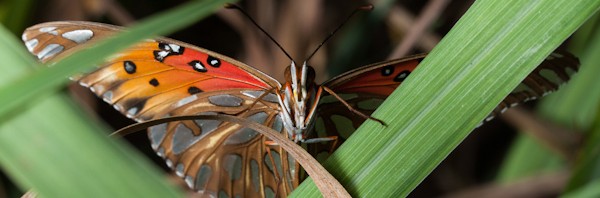
While out in the garden this weekend I spotted a gulf fritillary, Agraulis vanillae incarnata. They’re stunning butterflies:
A gulf fritillary hides among blades of lemongrass.
What first caught my eye was the silver reflections of the spots on the bottom of their wings. In direct sunlight it looks like they’re metallic; very eye-catching. But when the same butterfly is in diffuse light, those spots look white:
A gulf fritillary stands on a [Ficus] leaf.
Compare the first and second picture, and you’ll see that in addition to changing from metallic to white, the butterfly can also choose how much color to show on its underside. When it spreads its wings (as in the first picture), the bright red/orange coloration of its forewing is revealed; but when it rests with both wings pulled together and upright (as in the second picture) it can completely hide the red/orange color, thus showing only brown and white/silver. It can also partially separate the wings, to reveal just a bit of color (as it liked to do when it was annoyed with how close I was getting).
And speaking of color, check out the top of those wings:
A gulf fritillary stands amongst blades of lemongrass with its wings outstretched.
This butterfly only held open its wings for a few seconds after each flight attempt, so spotting the true colors of the wings takes finding one in flight and then watching it land.
For a fourth, and final, view of the gulf fritillary, how about a head-on look?
A gulf fritillary rests its foreleg on a blade of lemongrass.
Sleek and slim, complete with a coyly resting forelimb.
And in case you didn’t realize, all four of these images are of the exact same individual. It’s surprising how different it looks depending on angle and lighting.
The larvae reportedly only eat passion flower vines; I wonder which of my neighbors has one.
More pictures
To see more of my insect pictures, head to my Insects gallery.
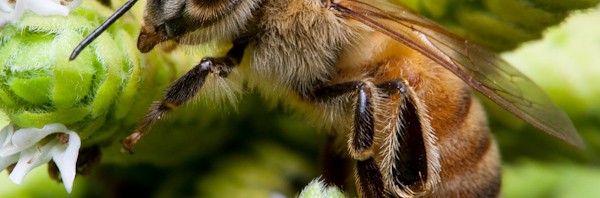
It’s been a busy summer without much time for photography, but today I grabbed the camera and headed for my garden. I was happy to capture this closeup:
Bee on marjoram. Macro.
That’s a bee (likely a honeybee, Apis mellifera) on a marjoram (Origanum majorana) inflorescence.
Look at those antennae (I love the ball joint at the base), those big eyes filled with ocelli, veined wings, and all those lovely little hairs. She’s a beauty!
Many thanks to my good friend Hannah, who gave me a set of wireless flash triggers that played a key role in capturing this image.
More pictures
To see more of my insect pictures, head to my Insects gallery.
Michelle and I tend our backyard garden every summer, and one of our joys is seeing the first produce of the year slowly ripen on the plants. Just this week our first cherry tomatoes (Solanum lycopersicum) are finally ripening, and so yesterday I took a few pictures of the glorious first fruits:
Two ripe Sun Sugar cherry tomatoes still attached to the plant, photographed using natural light only.
The tomatoes were in some nice diffusely-lit shade, and that’s what you see above – I used a tripod to stabilize the camera, but otherwise didn’t need anything else.
But since I’ve been having fun experimenting with off camera lighting recently, I decided to pull out my lighting gear and try some “studio” style lighting on the fruits.
The same two ripe Sun Sugar cherry tomatoes, photographed using “studio” lighting.
Those are the exact same fruits in the exact same position, but now they’ve been lit using the “invisible black background” technique I’ve described before1.
What a difference lighting makes! The black background makes the fruits pop out visually, thanks to less visual clutter, but I think it also makes the scene look more artificial (or as though it was taken at night). My favorite comment so far comes from my dad, who said that the fruit look like two “hot Jupiters”. Little tomato planets floating in space; I like it.
Footnotes
1 Two snooted flashes were setup, one on either side of the fruit, and I used my gray card to shade the background from the primary flash’s illumination. Both flashes also had great natural gobos: the branches of the plant itself.
–
As I’ve postedbefore, Michelle loves to make chainmail. So, it wasn’t a surprise when she recently asked me to take a picture of her latest project1:
A european 8-in-1 copper chainmail bracelet with a sliding clasp.
For the purposes of this post, note the background: it’s seamlessly black, with nothing at all visible. And that background was created with no work at all in Photoshop (other than removing a string I used to support the project) – it was created solely by careful placement of off-camera lights. As the method is pretty neat, I thought I’d show you how I did it.
The first technique most people think of for getting a black background is to, well, put something black behind the object. While this works, it requires careful lighting and spacing to ensure that the black object doesn’t become visible (as more than just solid black) in the image. I did just this outdoors with my amaryllis flower bud images, but I had to find flower buds with enough shaded space behind them to hang a black T-shirt on a spare chair well behind the depth of field of the image, and then whenever stray light hit the T-shirt you could see the folds in the fabric. Annoying.
For the maille bracelet I created a black background by putting absolutely nothing behind the maille. And I mean literally nothing: here’s what the maille looked like as I was setting it up:
The bracelet seen in natural room lighting in my "studio"; the metal rod on the right is the stand the bracelet is hanging from.
Michelle’s been busy lately working on maille projects (and I’ve been slow on posting pictures of them – the last one I posted was her dragonscale bracelet), so here’s a post with some of her latest work.
A a white and black Japanese 12-in-2 bracelet.
This zebra striped bracelet is made out of black and white anodized aluminum rings (18 gauge 1/4″ diameter) held together by bright aluminum rings (20 gauge 1/8″ diameter) in a Japanese 12-in-2 pattern.
Byzantine earrings made from anodized niobium.
These colorful earrings are made from anodized niobium and bright aluminum rings (20 gauge 1/8" diameter) woven in a Byzantine pattern.
Blue and silver aluminum dragonscale earrings.
These are made from blue anodized aluminum rings (18 gauge 1/4") and bright aluminum rings (19 gauge 5/32") woven in a dragonscale pattern.
Shiny Byzantine earrings.
Another pair of earrings made in a Byzantine weave, this time using all bright aluminum rings (20 gauge 1/8").
A european 8-in-1 copper chainmail bracelet with a sliding clasp.
This bracelet is made out of copper rings (20-gauge, 3/16″ diameter) woven together in a European 8-in-1 pattern; I’ve got a separate “behind the scenes” post detailing how I created the all-black background for this picture.
Planarians are free-living aquatic flatworms that are staples of high school biology labs. The species I was able to photograph, Dugesia tigrina, is fairly small, growing up to about an inch in length when stretched out.
A live brown speckled planarian {Dugesia tigrina} swimming in a dish full of water above a white background. The light is coming from the left, and the worm’s shadow is subtly visible. The pharynx (a tube the flatworm extends from its body for feeding) may be visible as a darkened tube in the middle of its body.
Planarians are utterly adorable. Their heads have cute little eyespots (ocelli) that sense light and auricles (the triangular extensions) that reportedly sense water currents. The eyespots lack lenses and a retina, so these cute little worms aren’t looking up at you and seeing your face, but they can detect the intensity and direction of light, allowing them to swim away from light (which is one of the easiest behaviors to observe in them; shine a light on them, and they’ll swim directly away from it). And when they move, they glide through the water with serpentine elegance.
A brown speckled planarian {Dugesia tigrina} swimming diagonally in a dish of water on a white background. The planarian’s eye spots (ocelli) and auricles are plainly visible in this closeup on its head.
The dark portions of the eye are not actually the photosensory nerves. Instead, the dark portions are pigment-filled cells that partially surround the photosensory neurons, shading them from one side (thus allowing them to detect the direction of light without a lens, retina, or movable eye).
While many flatworms are parasitic, these planarians are not; they’re free-living omnivores that swim around in freshwater ponds nomming on whatever they can find predators feeding on small insects and other invertebrates they’re able to capture (see comment thread for citations). In the lab we frequently feed them small pieces of liver or thymus.
A live brown speckled planarian {Dugesia tigrina} feeding on a small piece of thymus. The planarian’s pharynx, a feeding tube that extends from its gastrovascular cavity (digestive tract), is easily visible connecting the mid-section of the worm to the food.
The way flatworms feed is just awesome. Instead of having a mouth at their head, they extend a tube (their pharynx) from the middle of their body and latch this tube onto their food. They then “suck” the food up through this tube and into their digestive tract.
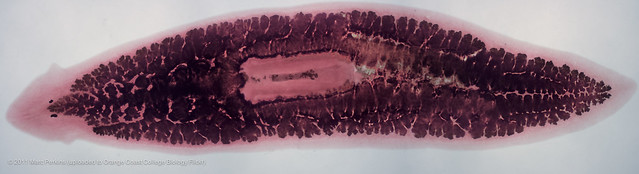
Speaking of guts, flatworms’ digestive tracts aren’t built like ours are: they have just a single opening that leads to and from their digestive track. This contrasts with our style of digestive tract, which has two openings: a mouth and an anus. The planarian style of digestive tract is called a gastrovascular cavity, and it can be seen in the following image of a preserved planarian slide:
A whole preserved planarian seen through a compound microscope after the gut has been filled with ink. The head is visible at the left, most notably the ocelli (eye spots) and auricles (triangular outgrowths from the head). In the center of the body is the pharynx, a long tubular structure that is extended from the body to feed. The pharynx connects to the gastrovascular cavity at the left end of the tube. The gastrovascular cavity extends throughout their body; in this individual it has been filled with black ink.
And yes, this does mean that digested food has only one way out: through the same opening that they used to get the food in.
Planarians are used in biology labs primarily thanks to their easy availability from biological supply houses ability to regrow tissues from traumatic injuries: when cut in half they can regrow the other half of their bodies. This is because while they can reproduce sexually using sperm and eggs, they can also reproduce asexually via fragmentation. Fragmentation is a reproduction mechanism wherein an organism literally pulls itself in half, with both halves growing into complete new organisms. This leads to the classic high school biology “experiment” wherein students cut flatworms in half and wait for them to regrow. We won’t be doing that here. But this picture of two flatworms swimming next to each other almost looks like it 🙂
The head of one brown speckled planarian {Dugesia tigrina} swimming up positioned next to the tail of a second planarian swimming down in a dish of water on a white background.
I get live planarians each semester to show my biology classes, but sadly most students just give them a passing glance. Next time you get a chance to observe these cuties, put them in a dish of water, get a dissecting microscope and some liver, and plan to spend some time with them. They’re great fun!
A brown speckled planarian {Dugesia tigrina} turning in a circle on a white background. The planarian’s eye spots (ocelli) and auricles are plainly visible on its head.
Last week I visited Vasquez Rocks, and wrote about the trip in this post. While the geological features were neat, what really interested me were the critters growing on the rocks. After all, what organismal biologist can go to a park with the word “rocks” in the name and not look for lichen?
For those who don’t remember Bio 101, lichen are a symbiotic organism: they’re a fungus and either a green alga or cyanobacterium living as a single unit. Fungi are masters of living in dry, dessicated environments with low nutrients (many plants have fungal symbionts that help the plant’s roots get nutrients out of the soil). However, fungi can’t obtain energy from sunlight. Luckily for lichen, algae and cyanobacteria are photosynthesis experts. Pair the two up and you’ve got an amazing organism: one that can survive in a desert, exposed to the full summer sun all day while living on nothing but bare rock. No soil to get nutrients out of. No possibility to send roots down to the water table. They’re awesome.
But from far away, lichen don’t look like much1 . After all, many species of lichen require years to grow a centimeter or two (growth rates of lichen are typically reported as mm/year). But look up close, and the beauty of these organisms reveals itself as a complexly structured body consisting of beautiful lines, textures, and colors.
A brown-fringed gray foliose lichen on a rock. My best guess is that this is in _Physcia_, but I'm not sure. The scale bar is 5mm (contact me if you want a version of the image without the scale bar).
Quick quiz: how many species of lichen are visible in that picture?
The gray one that fills the frame is the dominant individual, but there’s at least four species visible2. And the gray one is overgrowing all the other three. This is competition, lichen style. Lichen have only a limited amount of area where they can grow (the surface of some substrate), and inevitably they start to run into each other. Since they get their energy from light, whoever can overgrow the other is likely to win. You’re witnessing a fight to the death.
The number of lichen visible in that picture also demonstrates another characteristic of lichen that I love: they’re diverse. Walk into any given habitat that’s amenable to lichen, and within a few feet you’ll likely find a dozen or more different species. They’ll be different colors, textures, shapes, and sizes. See, for instance:
A crustose yellow ascomycete lichen growing on a rock. Multiple apothecia are visible. I believe this may be _Acarospora_ (_Acarospora socialis_?) or _Pleopsidium_, but I'm not sure. The scale bar is 5mm (contact me if you want a version of the image without the scale bar).
Most lichen are ascomycetes, meaning that their fruiting bodies are based around asci, which are often found in cup-shaped structures. Take a look at the picture above, and you’ll see a couple of little cups; these are their apothecia, and they’re filled with spores that will be released into the air to grow into new lichen.
Adding to the diversity of lichen is the range of sizes they come in. Compared to the two above, the ones below are growing as tiny individual units:

![A gulf fritillary [Agraulis vanillae incarnata] hides amongst blades of lemongrass [Cymbopogon sp.]. It looks like it's hyper aware; stalking prey (even though it's looking for nectar …). The bottom of this species' wings have beautiful spots that reflect silver in bright light (as you can see in this image), but are white in the shade. The forewings are also partially red. (Marc Perkins)](http://www.photoshelter.com/img-get/I000043.P.1oWPes/s/700/466/20140719-garden-insects-MG-1837.jpg "Fritillary hiding in the (lemon) grass")
![A gulf fritillary [Agraulis vanillae incarnata] stands on a [Ficus] leaf. The spots on its wings when closed are white in the shade (as in this image), but reflect light to appear a beautiful silver when illuminated. When its wings are closed, the bright orange and red colors of the butterfly are completely hidden. (Marc Perkins)](http://www.photoshelter.com/img-get/I0000uYOrspHYlKI/s/700/466/20140719-garden-insects-MG-1955.jpg "Fritillary on ficus")
![A gulf fritillary [Agraulis vanillae incarnata] stands amongst blades of lemongrass [Cymbopogon sp.] with its wings outstretched, showing off its bright orange colors. The bottom of its wings have silver spots on them, not visible in this picture. (Marc Perkins)](http://www.photoshelter.com/img-get/I0000VsZS_37vkH0/s/700/428/20140719-garden-insects-MG-1892.jpg "Fritillary in color")
![A gulf fritillary [Agraulis vanillae incarnata] rests its foreleg on a blade of lemongrass [Cymbopogon sp.]. (Marc Perkins)](http://www.photoshelter.com/img-get/I00007WhnRphnaN0/s/700/466/20140719-garden-insects-MG-1849.jpg "Fritillary up close")
![A bee (likely a honeybee; [Apis mellifera]) climbs a marjoram ([Origanum majorana]) inflorescence. The bee's eye, antennae, wings, legs, and fine body hairs are all in focus, as are the pistils and stamen of some of the marjoram flowers. (Marc Perkins)](http://www.photoshelter.com/img-get/I0000tsIDEF._QAQ/s/700/680/20140719-garden-insects-MG-1794.jpg "Bee on marjoram")